Introduction
Conditional webhooks in Canonic allow you to introduce logic-based branching in your workflows. This functionality enables the workflow to make decisions based on certain criteria.
Scenario Setup
Imagine you have a workflow that needs to categorize users based on their activity level. You can use a Conditional webhook to route the workflow based on specific conditions.
1. Create the Conditional Webhook
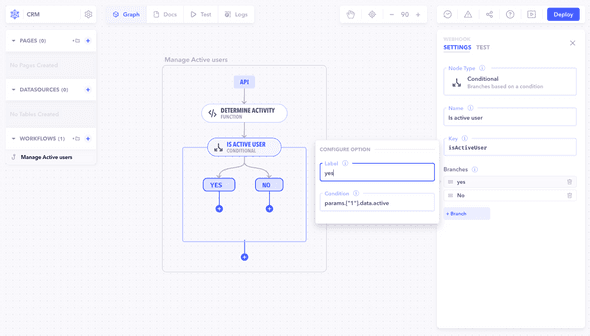
- Add a Conditional Webhook: Navigate to workflows and add a new Conditional webhook.
-
Configure Conditions: Set up the conditions for each branch of the webhook. For example:
- Branch 1:
params.["1"].data.activefor active users. - Branch 2:
params.["1"].data.inActivefor inactive users.
- Branch 1:
2. Attach Actions to Each Branch
-
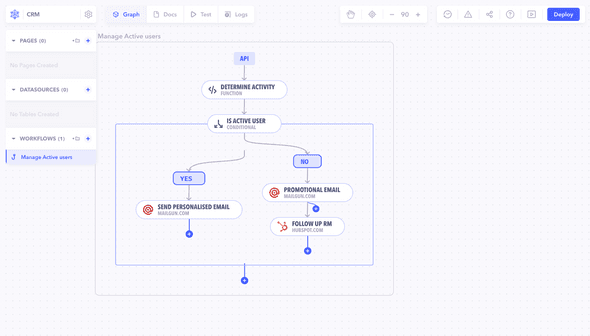
Define Actions: For each branch in the Conditional webhook, add subsequent webhooks or nodes that perform actions based on the condition. For instance, send a personalized email to active users or offer a discount to inactive users.
Testing and Validation
- Input Test Data: Provide test data that simulates different user scenarios.
- Execute Workflow: Run the workflow and observe how it routes based on the conditions.
- Analyze Outputs: Verify that the correct actions are taken for each condition.
Best Practices
- Clear Conditions: Ensure that the conditions in your Conditional webhook are well-defined and unambiguous.
- Efficient Branching: Optimize the logic in each branch to perform efficiently and avoid unnecessary complexity.
Note: Using Conditional webhooks effectively in Canonic workflows allows for dynamic and flexible process flows. It's essential to thoroughly test and validate each path to ensure the workflow behaves as expected under all conditions.

