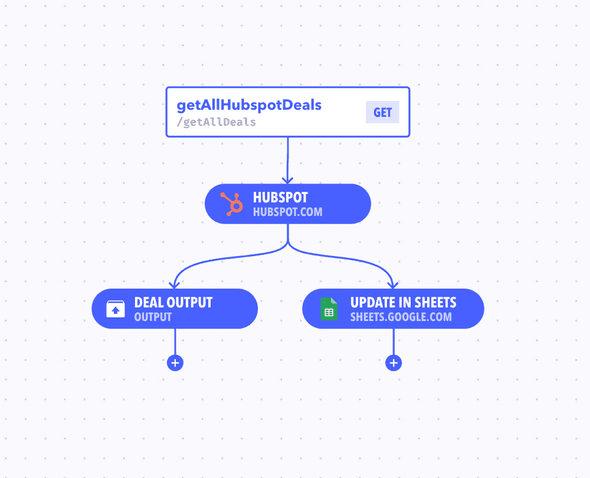
Webhooks allow you to trigger certain actions whenever an endpoint is triggered. They can be chained together as well as run in parallel to create complex workflows and operations.
We support a variety of 3rd party integrations. You can perform actions such as send messages, trigger deploys, execute serverless functions and much more.
Example: Send a message on Slack whenever a new entry is created in the Leads table.
Top Level Properties
| Property | Description |
|---|---|
| Name | The name of the table. Can be any arbitrary value. |
| Type | The type of resource. It can be either list type or an individual table. Learn More |
Webhook Types
You can create different types of webhooks based on the kind of action you want to perform.
Function
Execute a custom function written in code. You can write your function in Javascript in Canonic's code editor. It has access to all the data from the previous webhooks. Read More
Integration
Execute 3rd party integration operations. 100s of operations ranging from sending messages on Slack to adding rows to your Google sheet. These can be configured without writing any code, and one-click authentication. Read More
Output
Transform and add outputs to your final result with these nodes. They inject the result of the code snippet under a specific key. For example, you can clean up the response from google sheets and add it to your endpoint's output. Read More
DB Query
Execute database queries within your workflow. The DB Query webhook allows for direct interaction with various types of databases like MongoDB, MySQL, PostgreSQL, Redis, Microsoft SQL., by writing and executing raw queries. This webhook is ideal for fetching, inserting, updating, or deleting data in your database dynamically.
API
Make external HTTP requests to third-party services or your own APIs. The API Node webhook supports various HTTP methods, enabling a wide range of actions like data retrieval, posting data, updating data, and more. It allows you to configure request details such as method, URL, headers, and body, making it a versatile tool for API integration.
Conditional
Create dynamic decision branches in your workflow based on boolean conditions with the Conditional Node webhook. This type of webhook is used to direct the flow of the workflow based on specified conditions, allowing for more tailored and responsive workflow actions depending on the input data or the outcomes of previous nodes.
Creating a Webhook
Create a webhook by clicking on the + button next to the mutation you want to add the webhook to.
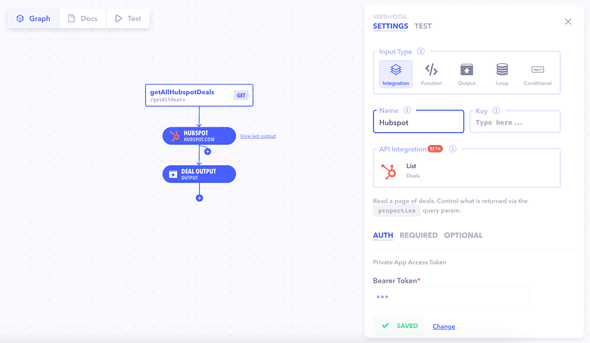
You will see a new webhook pop up on the graph with the the properties panel for the webhook visible on the right side. Fill out the properties. Once done, close the properties panel to save your changes.
Editing a Webhook
You can edit a webhook by clicking on the webhook node on the graph. The properties panel will open up where you can edit all necessary properties.
Note: Some properties are editable but are not recommended to be edited once you go live with your project as they can cause loss of data. You will be shown a warning when performing such actions.
Note Although changes are saved automatically, they must be published for them to reflect in the Docs and be available for consumption.
Deleting a Webhook
A webhook can be deleted by simply right clicking on the webhook and selecting delete.
Caution! This is a dangerous action and can cause permanent loss of data once the graph is published.
Chaining Webhooks
You can chain multiple webhook together. To execute another webhook after the previous webhook completes, click on the "+" button on the right side of the webhook to create another webhook that would be chained to the previous one.
To run another webhook in parallel, click on the plus button on the left, near the previous webhook to create one in parallel.
Passing/Accessing Data
You can access the results of any of the previous nodes in the same chain. Learn More
Inside the code editor.
In the Code Editor, you can access the data passed to your function through the params object. This object provides access to both the input data and the output of any preceding webhooks in the workflow.
Here's how you can use params in your code:
module.exports = function (params) {
  // Accessing the direct input data to this node
  const inputData = params.input

  // Accessing data from the previous webhook, assuming it's the second node in the workflow
  const previousData = params["1"].output

  // Implement your custom logic here using inputData and previousData
}
This code structure allows you to effectively utilize the data received by the node for processing or decision-making purposes.
Inside webhook configuration.
When configuring webhooks, especially in fields like integrations or conditionals, you can reference the output of previous nodes using a specific notation. This notation is based on the index of the node and the desired property, formatted as NODE_INDEX.PROPERTY.
For example, if you want to access the output of the first node in your workflow, you can use either 1.output or {{1.output}} in your configuration fields.
This method enables dynamic referencing of data from previous nodes within your workflow, allowing for more complex and interdependent logic in your workflow setup.


